EP1000
web-pk Jekyll template
Mr. Steven Chew has kindly created a web template which you can use to create a professionally looking website. This site is created using a static site generator - Jekyll, which converts markdown using the instructions from a configuration file to HTML. Github provides Jekyll as a transparent application which automatically runs when any changes are detected on the site files.
In order to use/build this website properly, you need to use git and a Github repository. In our case, we shall use the Github Desktop application and link directly into our repository.
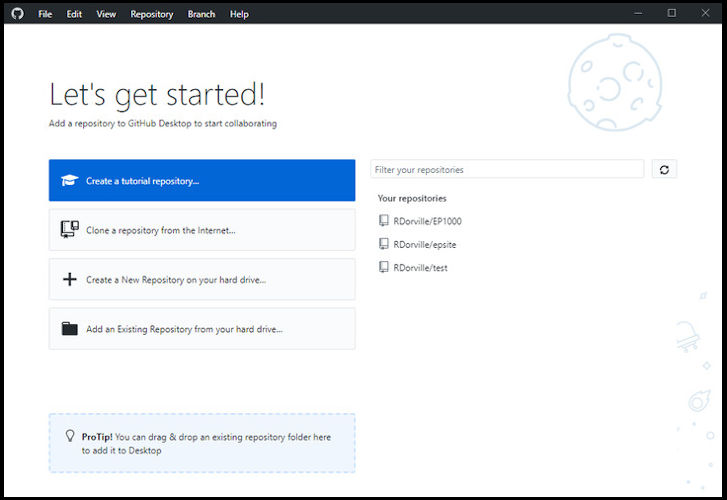
Install Github Desktop
- GUI interaction using git and github sites
- Download and install for Windows from https://desktop.github.com/
- Sign in to github
- provide email address and password
- configure git giving Name, email
Creating a website using web-pk
- Make a folder e.g. MyGithub on your local pc. We will put all our github repositories here.
- Clone the web-pk repository
- Use a browser to locate the Github repository - https://github.com/skeatz/web-pk
- Clone or download > Clone with HTTPS
- Copy the link provided i.e. https://github.com/skeatz/web-pk.git
- Github Desktop > Select “Clone a repository from the internet”
- Select URL, paste what you copied (i.e. https://github.com/skeatz/web-pk.git)
- Enter the Local path > …\MyGithub\web-pk
Note that the repo name is automatically appended to your selected folder destination. - Click Clone
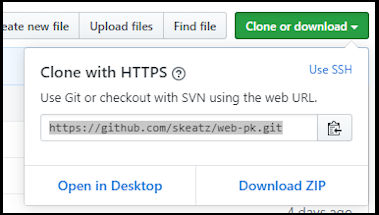
- the files from the repo will be downloaded and a new folder with the repository name “web-pk” will be created.
- You have successfully cloned/copied the files required for web-pk to your local pc.
- Use a browser to locate the Github repository - https://github.com/skeatz/web-pk
- Create your own version of web-pk (e.g. EPBlogsite) using Github Desktop
- File > New Repository
- Name: EPBlogsite
- Description: My EP1000 Blog
- Local path: …\MyGithub\epblogsite
- Initialise with a README
- Publish your repository to GitHub
- Confirm the repository name and description
- Un-check “Keep this code private”, as you are using the free site
- Open the repository page on Github on your browser
- Check that it is created sucessfully, there should be a README.md file
- Enable github pages for this site
- Settings > Github Pages > Source > Master Branch
- Click on URL to check the site
- File > New Repository
- Copy the web-pk template to your site
- Copy the web-pk folders and files to your epblogsite folder
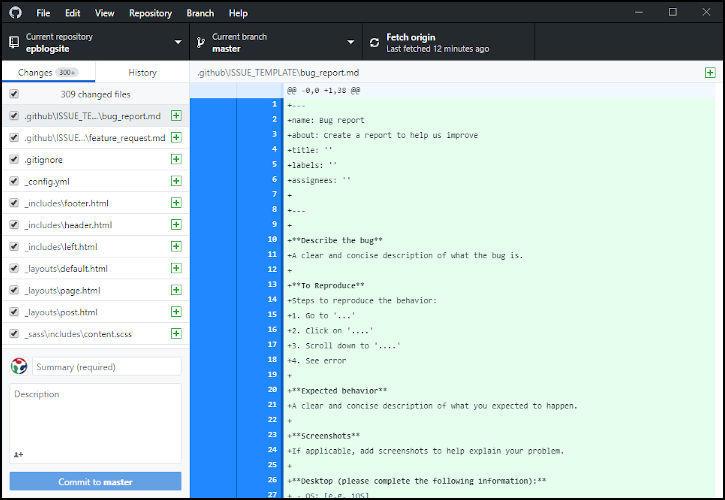
- Note the changes in GitHub Desktop
- Shows the files that were added
- These files are in your local folder
- Copy the web-pk folders and files to your epblogsite folder
- Add these files to the staging area
- Summary > Added web-pk site
- Click “Commit to master”, your local repository on the pc is now updated
- Update the Github Repository
- Click “Push Origin” - Push commit to the origin remote
- Use your browser to examine the Github repository
- Configure the new epblogsite (on your local pc)
- Edit _configure.yaml
- Change: “title: Your Name Website” to “title: EP1000 blog”
- Change: “baseurl: “/web-pk”” to “baseurl: “/epblogsite” to indicate where your site is located
- Save
- Edit _configure.yaml
- Update your github site to reflact the local pc
- Github desktop shows the changes you have made to the _config.yml file.
- Enter a Summary e.g. updated _config.yml
- Commit to master
- Push Origin
- Check your site with the browser
Tips to configure your web-pk site
- Change your avatar on your Github site to insert it into your blog site
- _config.yml
- shows the navigation bar, add/remove menu items there. The pages are linked in the docs folder.
- you can also use social media to point to your feeds
- These files are found on the root
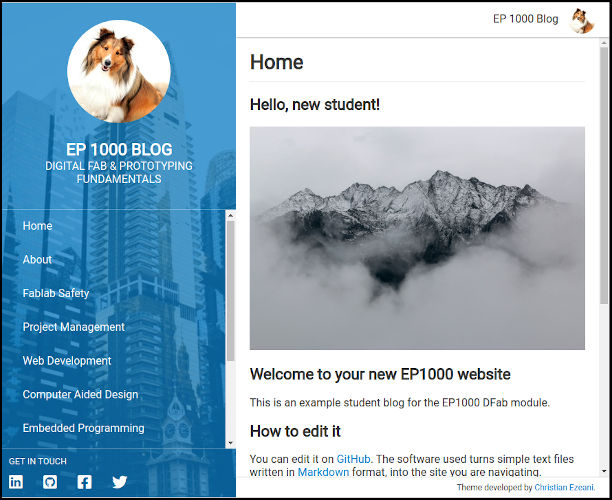
- index.md - the home page
- about.md - information about this blog or yourself
- contact.md - how to contact youe
- code-of-conduct.md - information on use/blogging of this site
- These files are found on the docs folder
- safety.md, web.md, proj-mgmt.md, 3dprint.md etc
enter information of your project/blog here. - place your images in the images folder and link them there.
- safety.md, web.md, proj-mgmt.md, 3dprint.md etc
- The assets folder
- allows you to change the images on the left pane.
Git process
This is a brief outline of the git process done by the Github Desktop (GHD). git uses (traditionally) commands entered on the CLI (command-line interface). Github Desktop specifially uses a GUI to convert actions to this commands.
- git config –global user.name “John Doe”
git config –global user.email johndoe@example.com- GHD > File > Options > Accounts
- Sets up accounts for syncing with the Github repository
- First-Time Git Setup
- git init initialises a git repository
- GHD > File > New Repository
- Initialises a new repository for git operations.
- Getting a Git Repository
- git clone https://github.com/user/repository.git
- GHD > File > Clone Repository
- Clones a repository from github. The repository name is usually used as the folder name, unless change.
- Getting a Git Repository
- git add files
git status - shows new/changed files- GHD > Files that are highlighted have changed and to be added
- Recording Changes to the Repository
- git commit -m “information about change”
- GHD > Summary “information about change”
Click “Commit to master” - Adds files to the staging area, ready to be uploaded to the remote repository
- Recording Changes to the Repository
- GHD > Summary “information about change”
- git push
- GHD > Push to repository
- Transfers the files from the staging area to the remote repository on Github
- Working with Remotes
May 2020